Professional Style Peer Interview
100 Points Due: TBD
Overview/Requirements: Conduct a 10-15 minute peer interview and then edit it down to a 5 minute polished feature. Both versions must be available on your computer but only the edited version will be turned in on the class flash drive. (You will need to leave the full interview on your computer so I can evaluate your editing decisions.)
1) The interview should be honest and the questions should be insightful.
2) You will not be required to present your project in front of the class. So be yourself. You will be thankful in 20 years!
3) You will be editing the interview FOR the person you interviewed.
4) You will be required to add images/video (also known as cutaway shots).
5) You will be required to add subtle instrumental background music to the interview.
The Process:
1) Ask one of your peers to be your interview subject (and you will be their interview subject).
2) Visit the following 2 links and read through the questions to gain some understanding into the process of choosing interesting and insightful questions...
Link 1 this site
Link 2 More question ideas....Click here and read through these as well.
(Tip: write down the question #'s that you might like to use)
3) Create a google doc & type up a list of 10- 15 "insightful" questions in addition to the10 required questions found below. *TOTAL: 20 - 25 questions.
DUE: 12/15/17
*Choose a fairly equal amount serious, fun, and personal questions to add variety and balance to the interview. Organize them by category. (list all the random/fun questions together, list all the serious/philosophical questions together, etc.
10 Required questions from Mr. Matuch
- What would you say to an incoming 6th grader if they asked you to describe the “middle school experience” & what advice would you give them?
- Looking back on your past three years here at Hawthorn, which staff member or teacher will you miss the most and why?
- If you could repeat your last three years at Middle School North, what would you have done differently?
- What are some of your goals for high school (both academic and non academic)?
- What would you like to do (as a profession/career) when you are older?
- If you knew you only had 1 month to live, what are some of the things that you would do with the time that you had left?
- What do you believe is the purpose of life? (Why were we put here on this earth?)
- If they were to make a movie about your life, what actor or actress would be the perfect choice to play you?
- What are 3 things that you feel thankful for in your life?
- What is one of your greatest strengths and one of your greatest weaknesses as a person?
Step 5) Print 2 typed copies of the questions.
Class Printer is named: MN-Lab807-HP2430
* Give one copy to Mr.Matuch by the due date.
* Give the other typed list of questions to the person you will be interviewing.
Period 4 Interview Schedule - 3 sets of partners per slot
Friday 3/27
1) gabby and maddy Gold memory card 1 Finished
2)
3)
Monday 3/30
1) Zac and Pablo - * Not ready with Q's - Finished Mem Card 1
2) Diego and Eric Finished Memory Card 3
3) Candela and Katherine Finished Mem Card 2
Tuesday 4/1
1) Chloe and Sofia Mem Card 1 Finished Memory Card 1
2) Keith and Miles Mem Card 2 Finished *Not ready with q's
3)
Wednesday 4/2
1) Artur and Tony L Memory Card 3 Finished
2) Yael and Tony P *Yael not ready with Q's memory Card 2 Finished
3) Stephanie and Lizzy L Memory Card 1 - Finished
Thursday 4/3
1) Ryan and Sam Memory card 3
2) Nadia and Arely
3)
Friday
Period 5 Interview Schedule - 3 sets of partners per slot
Friday 3/27
1) Mia and Liza Gold Memory card 1 Finished
2) Anna and Tyler+Talia Gold Memory card 2 - Finished
3)
Monday 3/30
1)Leticia and Ester Mem card 1 Finished
2) Rylee and Sasha Mem Card 2 Finished
3) Henri, Elijah, and Jonathan Mem card 3 Finished
Tuesday 4/1
1) Arif and Aldo - Mem Card 2 Finished
2) Maurycy and Nicanor - Mem card 3 Finished
3) Ana and Juliana - Mem card 1 - Finished
Wednesday 4/2
1) Brandon & Erik & Kevin - 2 on silver mem card 1 Kevin on Gold #1 Finished
2)
3)
Interview Rubric - Print out a copy and submit upon completion of project.
| interview_rubric_requirements_-2.pdf |
Editing Your Interview in Final Cut Pro
The development of editing skills is the primary objective for this project. Now that you have completed what could have ended up being a 10 - 15 minute interview, it is your job to decide what goes and what stays as you cut the interview down to 5 minutes.
3) BEST EDITING WORKFLOW!!!! Watch the entire interview with your list of questions in hand. As you are watching, mark your question list with a "-" for answers that you know you do not want to keep, a "check mark" for answers that you may want to include, and a "+" for answers that you know you definitely want to include.
4) Time Saving Tip! If you find out that your interview subject is not framed correctly or that the volume needs to be adjusted, fix the video clip while it is still in the event. That way you won't need to make multiple individual adjustments in the timeline later.
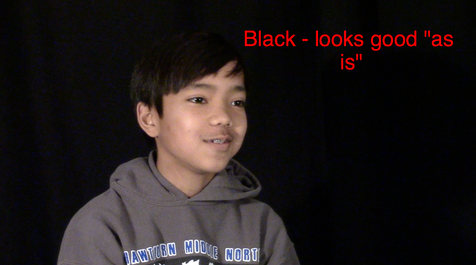
5) Create text titles for all of the questions that you know you are going to keep. Make sure they are displayed long enough for the audience to read them comfortably in a font/background color that is clearly readable.
6) Next locate the answers that you need for each question and add them to your project timeline.
7) With all the titles and "+" answers included, check to see how long your interview is so far. If you are still under 4 minutes, you can revisit your question list and start to add some of the "maybe - Check mark" answers to the project. Insert them where they fit the best in regards to the type of question it is (serious, fun, etc.) Do this until you are just under the 4 minute mark.
POLISHING UP YOUR INTERVIEW - Making it more "Professional" & "A " quality.
8) Use cut away shots when possible. Cutaway shots are needed for "A" project & grade quality. Don't force them on every question but don't pass up opportunities to use them either.
Photoshop Elements is on your computer if you want to use that to create a "fun" cutaway like the Mr. Collins spiderman example found below. This was in reference to his answer about his childhood hero.
*Ask your interview subject to bring in or send you any pictures/video that may relate to any of the final answers that were included in your edited project.
Internet photos may be used but personal photos work best for certain answers and earn more credit.
* Also, as usual, don't use watermarked photos or thumbnails which will result in blurry photos.
* Printed photos can be scanned as well.

AUDIO Additions & Audioblocks Info.
You can obtain additional background music by going to
audio blocks.com
*You do not need to log in with a username. Instead click on
"here" where is says "If your account is IP Authorized, click here."
Search and download the MP3 or WAV file.
Be aware that iTunes will open up (agree to all the terms/prompts) after downloading.
You can find the song/sound effect in either your downloads folder or in iTunes. Drag it into your timeline and apply the "ducking" feature.
How To "Duck" Your Audio - Watch This Tutorial!!!!!!
EXPORTING (SHARING) YOUR FINAL INTERVIEW PROJECT
To Export your project for grading and so that it can be easily transferred to a flash drive to take home, use the following directions....
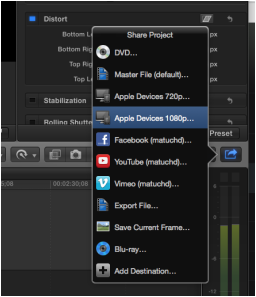
1) Click the Share icon on the far right side of the tool bar & choose Apple Devices 1080P.
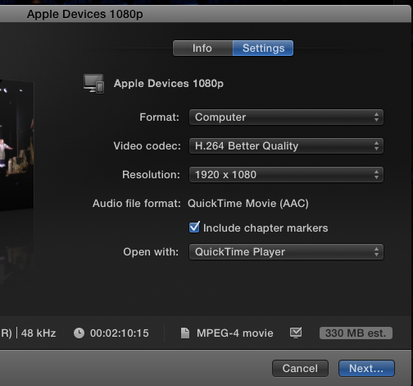
2) Click on the Settings tab and make sure your settings match the image below....
Format: Computer
Video Codec: Better Quality
Resolution: Whatever the highest resolution available is - most likely 1920 X 1080
Open with: Quicktime Player
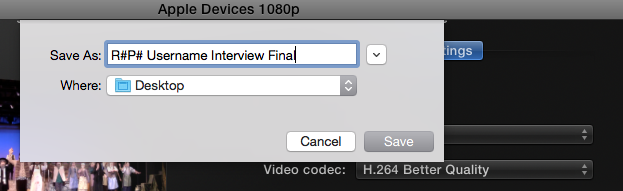
3) Make sure the project is named properly (R#P# Username Int with (person's name) Final) and the "Where" is set to desktop.
4) Click Save & make sure you wait until you get a notification pop up that will let you know that the sharing process is completed.
Position the completed movie file in the upper left corner of your screen. Then go to Google classroom to submit. (Add > File "Drag file into upload screen" Upload > Turn In )