Student Example Project
Lyrical Interpretation - Digital Story Style Music Video Project 100 Points
Rotation 3 (11 class periods)
Days 1 - 4 = Spend time gathering media (pictures/videos) based on the lyrics.
Days 5 - 9 = Bring in audio file and start assembling your project in Final Cut Pro.
Day 10 - Get honest feedback from 2/3 classmates... make any needed changes based on their feedback.
Day 11 = Export from FCP and turn in your project to google classroom.
Watch These 5 Short Videos First!!!! VERY IMPORTANT!
#1 - Get Your lyrics!
2) Make a new folder and rename it - this is where you will gather all your media.
3) Important - No Pixellated Images! - No Thumbnails !
4) No Watermarks!
How To Use Videoblocks.com and Graphic Stock.
Steps (In Text Version)
STEP 1 : Choose an interesting lyrical song.
Choose a school appropriate song that is between 3 - 5 minutes in length.
Avoid "pop" songs that are repetitive or lyrically uninteresting. Songs that are about "something" tend to lead to better visual imagery and ideas. Think of the lyrics as poetry. Research your song's meaning if needed. It is a good idea to save the lyrics to your desktop or print a copy out to jot down ideas.
STEP 2 : Gather High Quality Media (Video& Photos) - Days 1-4
1) Click on your desktop to activate the Finder Window.
2)Go up to FILE > New Folder Rename the new folder on your desktop to: DS Media (this is where you will gather all your photos and videos).
3) For Safari Images, make sure the dimensions are greater than 400 X 400. Make sure you click on the image, then Control Click > Save As and save the image to your desktop where you can move it to your media folder. DO NOT simply drag the small thumbnail image. NO Thumbnails, No Watermarked Images!If some images are filtered/blocked here at school, you can get them at home and bring them in. You can also do this if you fall behind. Use at least 3 images in your project - yes, you may use more.
4) VIDEOBLOCKS (Video and Still Images - now known as "Storyblocks"- Use at least 3 videoclips in your project. (yes, you may use more).
VIDEO CLIPS
Use this link to videoblocks.com and follow the directions below:
Click on "Log In" in the upper right corner of the screen.
Do not fill out any log in info. Instead click "IP Authorization"
Download the files you want. Either size quality is fine but the lower file size will download much faster.
After the download, you will then find it in your downloads folder.
IMAGES
Use this link to the IMAGES site for story blocks and follow the directions below:
Click on "Log In" in the upper right corner of the screen.
Do not fill out any log in info. Instead click "IP Authorization"
C) Remember, your imagery can be literal, symbolic or based on a concept you have for the song. Try to find out what the song is really about (research the song meaning, references, inspiration etc.). Be Patient! - It may take time to find the best image or video clip for a particular part of the song. You may want to gather a couple images for the same lyric to see which best fits later on.
D) Do not repeat the same images! (a couple repeating once is OK, but try to avoid it if possible)
E) For instrumental parts, gather video or photos that fit the mood of the song or the feel of the music as best as you can. Tip: close your eyes and think of what you see when you listen to the music?
F) If your searches are blocked too much by the filters here at school or if you start to fall behind, you can always gather photos at home and either upload them to a flash drive or to your google drive account (use upload file - don’t embed into a document)
3) (Optional) You may also use a small amount (up to 45 seconds) of original video footage (shot by or including you). For this, iPhones are a viable option if I do not have other camcorders available for you. Filming should take place away from school as much as possible since our locations are limited.
Then....
Step 3: DIGITAL CHALLENGE : Acquire the song file. (This should definitely be done by day 4)
It is up to you to figure out how to acquire and bring in the song file.
Tips: Bring the song file in on either a flash drive, CD or through google drive as a file.
If you don't own it, a good idea is to buy it & help support the artist whose work you happen to be using.
(NO iPods/phones! - they won't sync with school computers).
Days 5 -10
Part 2: Assemble/Edit your project using Final Cut Pro X
1) Create a New Event. FILE > NEW EVENT Name it: First Name Music Video
Make sure the "Create New Project " box is checked. Click OK. 2) Click on the new event that you just created in the sidebar and find the new "Untitled" project so you can rename it.
Rename it: R#P# Last Name MVDS
(R#= Rotation number P# = Period number
MVDS = Music Video Digital Story)
3) Create an opening Title(s) that includes: The name of the song, the name of the musical artist or group and project created by “your name”. "Centered Title" is a nice simple choice. (You can see how to create a title by clicking here)
4) Use the Import button OR simply drag and drop your media files into your main timeline (or event) from your desktop folder and put them in the proper order of your song. (IMPORTANT - The images go in the darker area of the timeline - the audio track goes below it - see next step).
5) THEN drop your song into the timeline below your clips . You can then adjust the timing as needed. DO NOT PUT YOUR SONG FILE INTO THE MAIN (DARKER) TIMELINE.
7) Adding the Ken Burns Effect (you must use the Ken Burn Effect at least 2 times) Simply Click on the crop tool icon. Select Ken Burns from the choices that appear and adjust where you want the photo to start and end by dragging the selection boxes. Click the "check mark" icon when done. *Remember to add variety when using the Ken Burns effect. For example, follow up a "zoom in" with a "zoom out" and vice versa. Just don't use the same movement over and over again consecutively. * Remember that making the photos with the Ken Burns effect a little longer in time makes the movement slower. * Adding transitions in between photos helps smooth them out and blend better together.
(You can see how to add Ken Burns effect by clicking here)
8) Add at least 2 transitions. Yes, you may add more. (You can see how to add transitions by clicking here)
9 Adjust Timing (clip/photo duration) and pacing to flow with the music. remember that you can easily drag in or drag out any items in the timeline to make them longer or shorter. (You can see how to modify (slow down/speed up clip by clicking here)
Part 3 - Receive honest peer feedback & revise. (Day 9 & 10) 1) Get honest feedback from a friend or two. Make any necessary adjustments/revisions. It is easy to replace a photo or video by dropping the new clip on top of the old and choosing "replace from start". This would keep the timing and duration the same.
REMINDERS & TIPS BEFORE SUBMITTING:
*Adjust the timing of your visuals/transitions etc. to flow with the music.
*Add the Ken Burns Effect at least 4 times and elsewhere when appropriate. Alternate movements (don't use the same effect (i.e zoom out) every time - add variety).
*Add at least 4 appropriate transitions to help blend together the visuals and enhance the flow of the project.
*Be patient - Find the RIGHT image or video clip for the lyric. If something is not working, delete the image and search again for a better replacement.
EXPORTING (SHARING) & SUBMITTING YOUR DIGITAL STORY MUSIC VIDEO PROJECT
To Export your project for grading and so that it can be easily transferred to a flash drive to take home, use the following directions....
1) Click the Share icon on the far right side of the tool bar & choose Apple Devices 1080P.

2) Click on the "Settings" tab. Make sure all of your settings match all of the settings in the image below. *Choose whatever the highest resolution is available) Then click "Next".

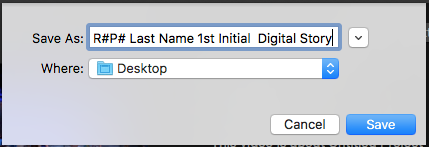
3) Make sure your project is named correctly - R#P# Username Digital Story and that the Where: is listed as the Desktop. Then click Save.
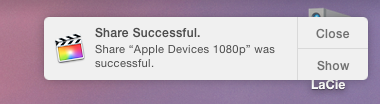
4) Make sure you wait until the progress monitor is finished at 100%. You will also get a notification pop up in the upper right portion of your screen that will let you know that the sharing process is completed.
5) Log into your google classroom account for this class. Find the project assignment. upload the file and turn it into google classroom.
Add > FILE > UPLOAD > Turn IN
| Digital Story Rubric.pdf |
